이번 포스팅은 이전의 세팅이 완료된 상태에서 주피터 랩을 킨 후 시작한다.
세팅은 아래의 링크를 참고하면 되겠다.
2023.08.01 - [python] - 가상환경 jupyter lab을 이용해 selenium 세팅하기 (Python)
가상환경 jupyter lab을 이용해 selenium 세팅하기 (Python)
여태까지 포스팅한 글중에 가장 쉬운 것 같다. ㅋㅋㅋㅋ 가상환경에서 주피터 랩을 사용하는게 항상 해왔던 거라 그런게 아니라 진짜 쉽다! 물론 이 포스팅은 세팅하기지 활용하기가 아닌 것도
forky-develop.tistory.com
우리는 크롬 드라이브를 사용할 예정이라서 크롬 드라이브를 먼저 다운해 주자.
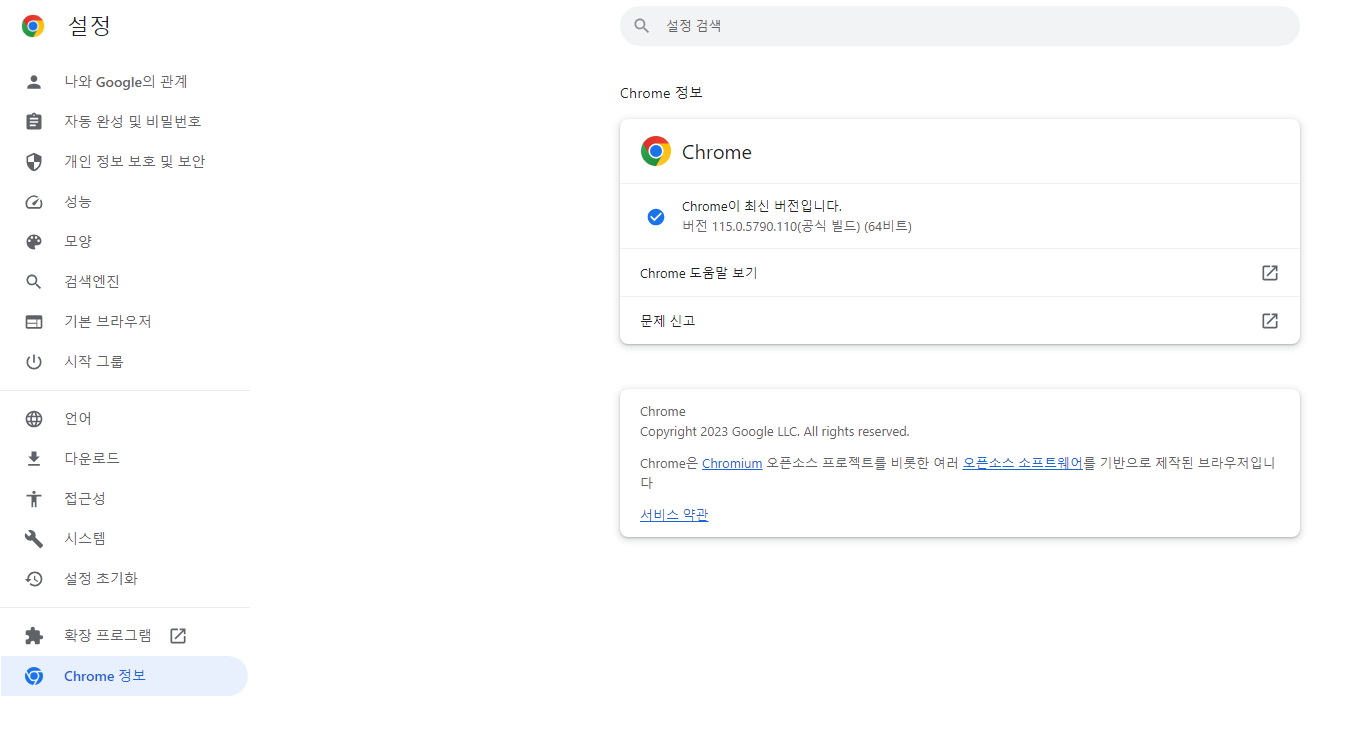
1. 크롬 버전 확인하기
크롬창 우측 점세개 메뉴 > 설정 > 크롬 정보 에서 나의 크롬 버전을 확인해준다.
2. 크롬 드라이브 다운하기
내 버전을 확인한 후에 크롬 드라이브를 다운해야한다.
115 이하 버전일 경우
https://chromedriver.chromium.org/downloads
ChromeDriver - WebDriver for Chrome - Downloads
Current Releases If you are using Chrome version 115 or newer, please consult the Chrome for Testing availability dashboard. This page provides convenient JSON endpoints for specific ChromeDriver version downloading. For older versions of Chrome, please se
chromedriver.chromium.org
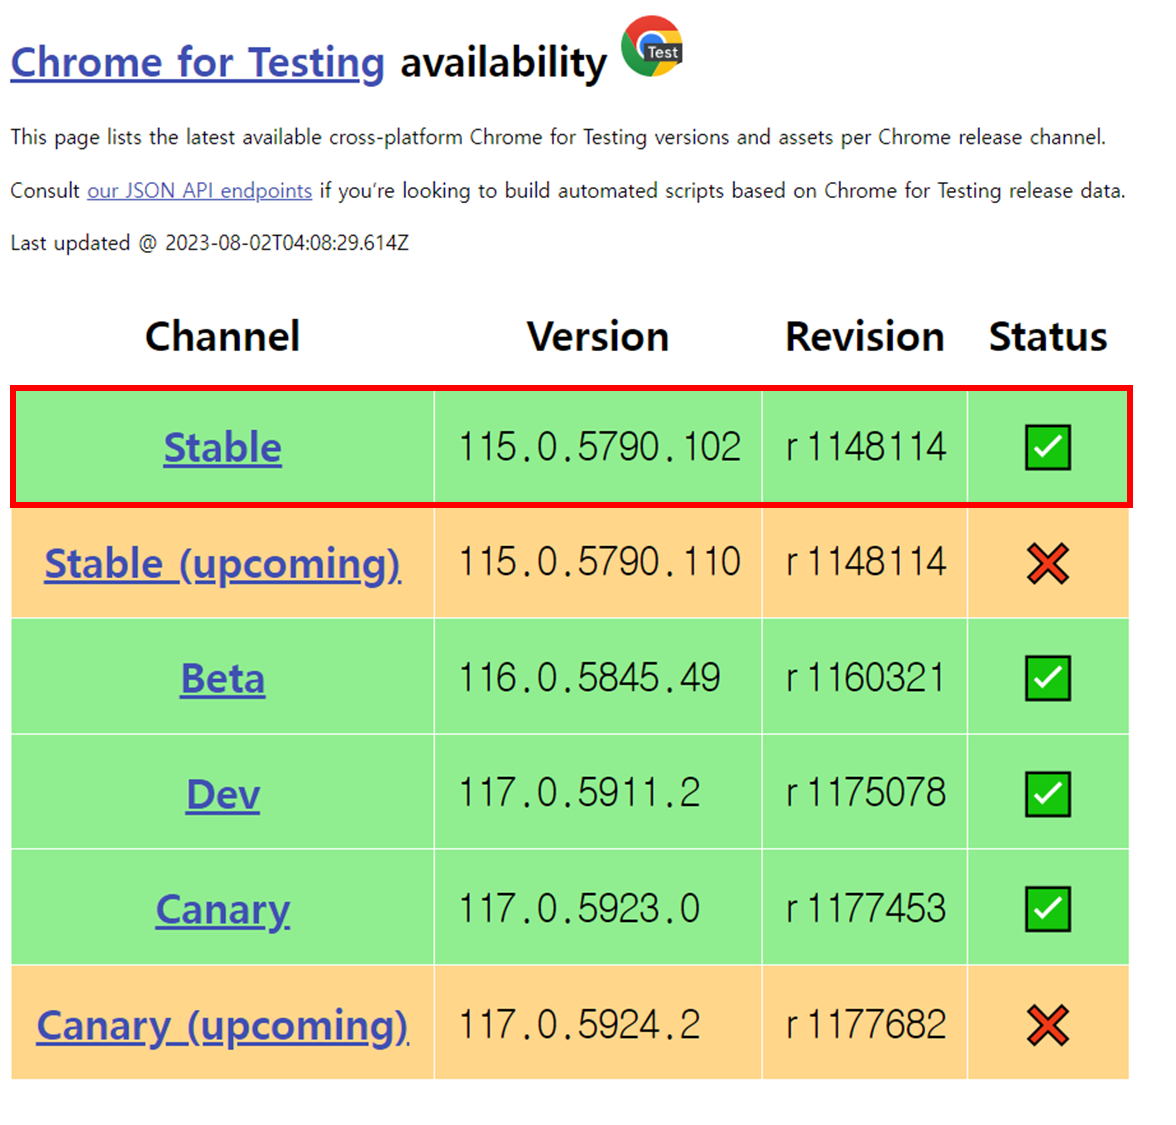
115 버전일 경우
https://googlechromelabs.github.io/chrome-for-testing/
Chrome for Testing availability
This page lists the latest available cross-platform Chrome for Testing versions and assets per Chrome release channel. Consult our JSON API endpoints if you’re looking to build automated scripts based on Chrome for Testing release data. Last updated @ 20
googlechromelabs.github.io
위의 링크에 들어가서 버전을 클릭한다.
이 때, chrome을 다운하면 안되고 chrome driver로 다운한다.
115버전을 예로 들면 stable 상태를 다운해야 하므로, 가장 최신버전이어도 그 이전 버전을 다운한다.
다운로드 후, 드라이브 파일의 압축을 풀어 python > crawling > driver 순으로 폴더를 생성해 집어넣자
3. jupyter lab 확인하기
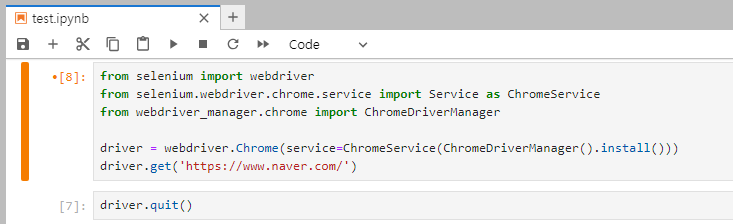
아래의 코드로 우리가 드라이버로 설정한 네이버 창이 크롬을 통해 열리는지 확인해보자
from selenium import webdriver
from selenium.webdriver.chrome.service import Service as ChromeService
from webdriver_manager.chrome import ChromeDriverManager

driver = webdriver.Chrome(service=ChromeService(ChromeDriverManager().install()))
driver.get('https://www.naver.com/')

드라이버를 종료시키려면 창닫기 말고 코드를 작성해 닫아주자
driver.quit()
'데이터' 카테고리의 다른 글
| Django로 회원가입/로그인 페이지 만들기 (Python) - 6탄 (0) | 2023.08.03 |
|---|---|
| Django로 회원가입/로그인 페이지 만들기 (Python) - 5탄 (0) | 2023.08.02 |
| Django로 회원가입/로그인 페이지 만들기 (Python) - 4탄 (0) | 2023.08.02 |
| Django로 회원가입/로그인 페이지 만들기 (Python) - 3탄 (0) | 2023.08.01 |
| Django로 회원가입/로그인 페이지 만들기 (Python) - 2탄 (2) | 2023.08.01 |


